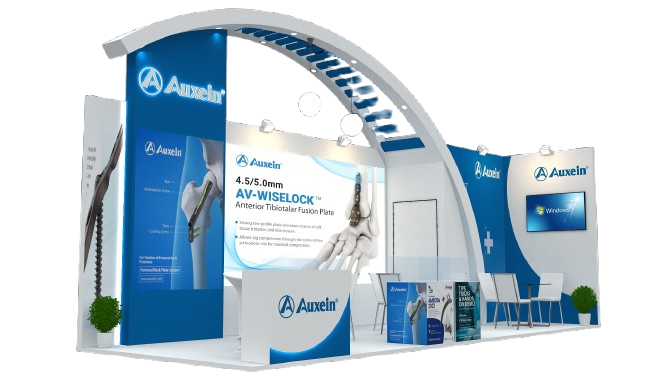

Planning an exhibition stand is not something you should leave until the last minute. There are many small details involved, and each one can affect how the final exhibition stand design looks and works at the exhibition. Before a trade show booth reaches the production floor, you need to think about your goals, the available space, budget, branding, products, visitor movement, graphics, furniture, lighting, technology, transportation, installation, and dismantling. It may seem like a lot to manage, but having a clear plan makes the whole project much easier. It also gives your trade show booth design and production teams a better idea of what you actually need, rather than leaving important decisions until the build has already started.
Step 1: Define Your Exhibition Goals
Before talking about colours, layouts, or graphics, think about what you want to achieve at the exhibition. Are you mainly looking for new leads? Do you want to launch a product, meet existing customers, demonstrate technology, increase brand awareness, or simply create new business opportunities? Your answer will have a direct effect on the way your stand is planned. For example, a company expecting many meetings may need comfortable meeting areas, while a business launching a new product may want that product to become the main focus of the stand. If lead generation is the main goal, an open exhibition booth may make it easier for visitors to approach the team. Having these goals clear from the beginning gives your custom exhibition stand design a much stronger direction.
Step 2: Understand Your Target Audience
Once you know what you want from the exhibition, think about the people you want to attract. Your stand is being created for visitors, so their needs should have a place in the planning. Consider who they are, what kind of work they do, what they may be looking for, and why they are attending the event. A technical audience may want to see a detailed product demonstration, while a wider business audience may prefer a simple message that quickly explains what your company offers. There is no need to put every piece of information on the stand. The better approach is to understand your audience first and then give them the information that is most useful to them.
Step 3: Check the Exhibition Space
The space you have at the exhibition will shape many of your design decisions. Before the exhibition stand construction starts, check the exact stand dimensions, location, open sides, height restrictions, and venue requirements. It is also worth looking at what is around your space. Nearby stands, main aisles, entrances, and visitor routes can all affect how people see and approach your stand. A corner position, for example, gives you a different opportunity from a stand that is open on only one side. Give all of this information to your exhibition stand builder at the beginning so the design is based on the real conditions of the venue rather than assumptions.
Step 4: Set a Realistic Budget
It is much easier to plan a stand when you know how much you have available to spend. The budget is not only about building the structure. You may also need to account for design, materials, graphics, furniture, lighting, technology, fabrication, transportation, installation, dismantling, and storage. Once these costs are understood, you can decide where your money needs to go. Perhaps a product display is more important than a large digital feature, or perhaps you need to invest more in meeting areas because most of your business happens through face-to-face discussions. If you attend several exhibitions, also think about what can be reused. Spending on reusable elements can make sense when they can be adapted for future events.
Step 5: Prepare Your Brand Information
Your exhibition stand design team needs a good understanding of your brand before work on the stand begins. Share your logo, brand colors, fonts, images, product information, brand guidelines, and important messages. It is also useful to explain what you want visitors to remember about your company after they leave the stand. The exhibition space should feel like your brand, not like a separate marketing exercise. Visitors may already know your company from your website, products, advertising, or social media, so keeping the same visual identity at the exhibition can make the brand easier to recognise.
Step 6: Plan the Visitor Journey
Try looking at the stand as if you were a visitor seeing it for the first time. What will you notice first? Where will you enter? Which product or message will catch your eye? Where will you go if you want to ask a question? Where will a product demonstration take place? Where will your sales team hold a meeting? These simple questions can tell you a lot about the layout. A good trade show booth design does not need to force people along a fixed path. Instead, it should make the space feel easy to understand and allow visitors to move naturally between the different areas.
Step 7: Create the Initial Design
Once the main information is ready, the actual trade show booth design work can begin. This is where your branding, products, graphics, lighting, furniture, technology, storage, and visitor flow need to come together. The stand needs to look good, but appearance is only one part of the job. Think about how your staff will use the space during a busy exhibition day. Can they reach the storage easily? Is there enough room for visitors to stop and talk? Can someone watch a product demonstration without blocking the aisle? Looking at these practical questions early can make the final stand much easier to use.
Step 8: Review the 3D Concept
A 3D concept gives you a chance to see the proposed stand before anything is manufactured. Do not just look at it from one angle. Think about how it will appear to someone walking along the aisle, standing at the entrance, or looking across from another part of the exhibition hall. Check whether the company name is easy to see and whether important products are in the right positions. Look at the meeting areas, graphics, colours, furniture, lighting, technology, and visitor pathways as well. Blueprint Exhibits is an exhibition stand design company that creates 3D booth designs that are ready before stand construction. If something does not feel right, this is the time to raise it. Making changes before production is far easier than making them after the stand has been built.
Step 9: Finalize Graphics and Content
Once you are happy with the main structure, you can move on to the final graphics and written content. Keep the main message simple. Visitors are not going to stop and read a long article from an exhibition wall, so focus on the information that really matters. Use clear headings, good-quality product images, and visuals that support the exhibition booth design. Before anything goes to print, check the spelling, logo, colours, product information, and graphic dimensions carefully. A small mistake on a laptop screen can become a very obvious mistake when it is printed across a large exhibition wall.
Step 10: Plan Lighting and Technology
Lighting and technology need to be thought about before exhibition stand fabrication begins. Decide where screens, touchscreens, demonstrations, and other digital features will go and make sure the necessary power and technical connections are available. Cable management also needs attention because loose cables can affect both the appearance and usability of the stand. Lighting can be used to draw attention to products, graphics, branding, or other important areas. A screen should help explain something, demonstrate a product, or give visitors useful information. Adding technology simply because it looks impressive may not add much value to the visitor experience.
Step 11: Move Into Exhibition Stand Fabrication
Once the design has been approved, the project can move into exhibition stand fabrication. This is where the ideas shown in the 3D design start becoming physical components. Structural elements, graphics, furniture, lighting features, and other parts of the stand are prepared for the exhibition. Quality checks are important here because the finished components need to match the approved design. Materials and components should be checked before they leave the production facility so that any problems can be dealt with before the stand reaches the venue. Blueprint Exhibits states that its stands are manufactured through its production facilities and inspected before delivery.
Step 12: Prepare for Transportation
Getting the finished stand to the venue safely is another part of the planning process. Different components need to be packed according to their size, material, and level of fragility. Graphics, furniture, structural pieces, and delicate features all need suitable protection during transportation. The team also needs to know when the venue will allow deliveries and what access arrangements are in place. A delay at this point can affect the installation schedule, so transportation should be organised well before the exhibition opens.
Step 13: Complete Exhibition Stand Construction
When the stand reaches the venue, the installation team can begin putting everything together. Exhibition stand construction may involve assembling the main structure, installing graphics, placing furniture, setting up lighting, connecting technology, and preparing the product displays. The work needs to follow both the approved design and the venue schedule. Once everything has been installed, take a final look around the stand before the exhibition opens. Check the branding, graphics, lighting, products, furniture, technology, storage, and general finish. It is better to find a small problem before visitors arrive than to discover it halfway through the first day.
Step 14: Provide On-Site Support
Even a carefully planned exhibition can bring unexpected problems. A light may stop working, a graphic may need adjusting, or a technical feature may need attention. Having an experienced exhibition stand contractor or project manager available on site means these issues can be dealt with without putting unnecessary pressure on the exhibiting team. Blueprint Exhibits includes on-site supervision in its exhibition process and coordinates installation and venue execution. This allows the client team to spend more time doing what they came to the exhibition to do, whether that means meeting customers, demonstrating products, or developing new business conversations.
Step 15: Manage Dismantling After the Event
The work does not stop when the exhibition closes. The stand still needs to be dismantled properly, and any components that will be used again should be packed and stored with care. This becomes especially useful for companies that attend several exhibitions during the year. Reusable structures, furniture, graphics, and other suitable components can make future events easier to organise. Blueprint Exhibits provides dismantling and storage services for modular exhibition booths as part of its process.
Why Choose Blueprint Exhibits as your exhibition stand builder and booth contractor company?
Blueprint Exhibits is an exhibition stand design company with more than 20 years of experience in trade show booth design and construction. Blueprint Exhibits provides custom and modular solutions based on the exhibition space, brand identity, products, and business goals. Our team of booth designers and contractors focuses on creating stands that are practical for staff, easy for visitors to explore, and connected to the company’s brand.
Planning an exhibition stand properly takes time, but it can make the entire experience much smoother. When the goals, space, design, production, installation, and future use are considered from the beginning, there is less room for last-minute confusion. Whether you are preparing for one important exhibition or planning several events across Europe, a clear plan can help you create a stand that works well for your team and gives visitors a reason to stop and talk.